In this page
Budgetizer is an expense tracking tool that allows you to view the cost of issues in real time.
Budgetizer calculates the cost of issues based on Jira worklogs.
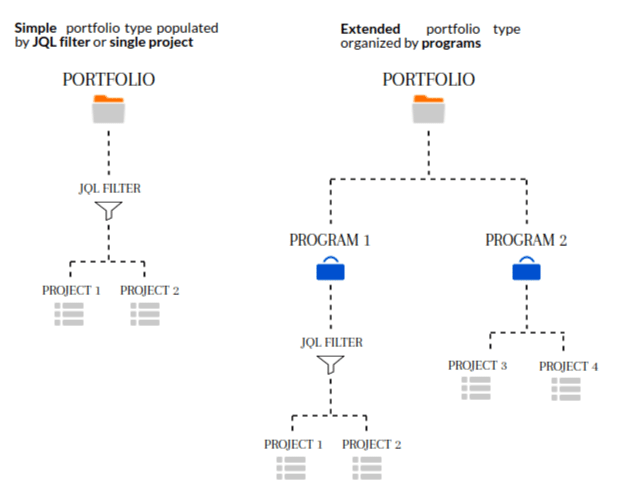
Budgetizer allows you to create your portfolio and add optional program level to follow-up planned vs spent budget and organize your epics, features and stories.
Questions? Ask us any time
In order to use Budgetizer, third-party cookies must be enabled. Please check your browser configuration.
For Microsoft Edge
Open Microsoft Edge, select Menu (3 dots icon on top right corner of the browser) > Settings > Site permissions > Cookies and site data.
Turn off "Block third-party cookies"

For Chrome
Open Chrome, select Menu (3 dots icon on top right corner of the browser) > Settings > Privacy and security > Cookies and other site data.
Turn on “Allow all cookies” OR "Block third-party cookies in Incognito"

For Safari
In the Safari app on your Mac, choose Safari > Preferences, click Privacy, then do any of the following:
Turn off “Prevent cross-site tracking.”
Turn off “Block all cookies”

By default, each user in the site-admins group is an application administrator and can access Budgetizer and browse portfolios.
This default group configuration can be updated in the "Permissions" tab.
Please note that all app users in "default admin group" will be able to browse all portfolios even if they don’t own it. |
If you don’t remember which is the group configured to access the app, go to “Manage your apps”. In the left side menu, You will see a settings link inside the Budgetizer menu |

Log in to your Jira instance as an admin
Click on the admin drop-down menu and choose Add-ons. The Find new apps or Find new add-ons screen loads
Locate Budgetizer
Click Free trial to download and install your app
You're all set! Click Close in the Installed and ready to go dialog

Depending on your navigation configuration, Budgetizer can be found in the top bar menu.

The default currency is USD. In the Default Currency field, choose your own currency.

Choose between simple portfolio or portfolio with programs.

Use the search bar to find the Portfolio in which the keyword is mentioned.
Please note that to find the portfolio you must enter at least 3 characters.
Select the number of items per page you want to display on a screen from: 10 - 20 - 50 items.
Use the navigation pagination below the table to browse the results page.
Click Create portfolio and enter all the required information : Name, Budget Planned, Members and Currency
Then, click Save changes
Please note that :
|

By clicking the Export Portfolios button, you can download the list of all issues in your portfolio and view the following information:
issue key - issue type - priority - status - fix versions - epic name - parent key - project - summary - original estime - remaining estimate - time spent - cost .
Export this content in an excel sheet can be useful for example to aggregate the cost of all issues by epic name. |
Label mentions the name of the portfolios you have created
Planned mentions the planned budget that you added when creating the portfolio
Spent indicates the amount of the budget already spent
Used ( % ) mentions the ratio of the amount of the budget already spent
Time Spent mentions the time already spent on the portfolio
The logo OPEN allows you to open the portfolio and display a new browser that we will detail below in this documentation
The logo EDIT allows you to edit portfolio information and, optionally, add a new member to the portfolio
The logo DELETE allows you to delete a portfolio
Charts are enabled at portfolio and program level.

Please note that in order to view a graph, data must be entered first. |
Select the portfolio type you want to create among filter - Projects - Program.
Filter : Use the search bar to find the filter
The filter must be public to be visible to any logged-in user :
|
Projects : Use the search bar to find the project
Program : Select Program to create new program and classify your portfolios


“Content" tab displays the content of the portfolio or program. |
Use the search bar to find Issue by summary in which the keyword is mentioned.
Please note that to find the Issue you must enter at least 3 characters.
Select all of the Issue types or select only one to display from: Task - Sub-task - Story - Bug - Epic,...
Select the number of items per page you want to display on a screen from: 10 - 20 - 50 items.
Use the navigation pagination below the table to browse the results page.
By clicking the Export content button, you can download the list of all issues in your portfolio and view the following information:
issue key - issue type - priority - status - fix versions - epic name - parent key - project - summary - original estime - remaining estimate - time spent - cost .
Yo can click Filter worklogs by date to active the filter.
Estimate (R) mentions the estimated time remaining to complete a task
Time Spent mentions the time already spent on the issue
Issue Cost mentions the cost currently spent on an Issue
Aggregated Cost mentions the aggregated issue cost
For epics, aggregated stories cost + expenses linked to the epic
For stories, aggregated subtasks cost + expenses linked to the stories
For others issues types, expenses linked to the issue
Planned mentions the planned budget for that Issue
Used mentions the percentage of budget already spent for that issue
The logo OPEN allows you to open an Issue in a new browser
The logo EDIT allows you to edit the issue planned budget
The logo SHOW WORKLOGS allows you to view all the worklogs logs by team member for the Issue
Check the total hours spent and the total budget spent on the portfolio.
If you already have worklogs in your backlog, the system will display the list of team members who have already added an entry, otherwise only the default hourly rate will be displayed.
Enter the default hourly rate and click on the ‘Save’ button.
You can also set hourly rate for each team member by clicking on “Set rates”.
Then, you can set the current rate for the team member, as well as setting a rate to apply for worklogs until a target date.


Add an expense to your portfolio. Select the date, the expense category among the list , provide a description, the amount and link this expense to an issue (optional)
Please note that these expenses will be added automatically to the total program expenses. |
By clicking the Export expenses button, you can download the list of all expenses in your portfolio and classify them according to your need.
Yo can click Filter worklogs by date to active the filter.
Click the logo EDIT to update an expense at any time.
Click the logo DELETE to delete an expense at any time.
Click the logo EDIT to update the portfolio information like budget or team members.

Click the logo DELETE to delete completely the portfolio.

At any time, come back to the list of portfolios by clicking the button : back to portfolio list.
The program level allows you to follow-up planned vs spent budget and organize your epics, features and stories.

After clicking on Create program, fill in the information required in the pop-up window :
Add Name,
Add Budget Planned
Add Members (These users must also bu added to portfolio members to view this program)
Save changes
Use the search bar to find Program by name in which the keyword is mentioned.
Please note that to find the Program you must enter at least 3 characters.
Select the number of items per page you want to display on a screen from: 10 - 20 - 50 items.
Use the navigation pagination below the table to browse the results page.
By clicking the Export programs button, you can download the list of all programs in your portfolio and sort them as needed.
Charts are enabled at portfolio and value stream level.
Please note that these expenses will be added automatically to the total program expenses. |
Select a Portfolio type among Filter or Projects.
To configure portfolios in programs, check Chapter 5 : Portfolio Configuration.
Click the logo EDIT to update the program information like budget or team members.
Click the logo DELETE to delete completely the program.
At any time, come back to the list of programs by clicking the button : back to program list.
Budgetizer is part of the Atlassian Bug Bounty program aiming to continuously improve the security of the app by leveraging crowdsourced vulnerability discovery methods available through bug bounty.
All app properties related to budgeting and costs are only stored in the customer’s instance. Please note that app properties used for budgeting are hidden for users not in the app admin group / view group, but depending on their global permissions, they may have access to these properties through API.
Please raise an issue in our Help Center in case of questions or to report a bug, we are here to support you.